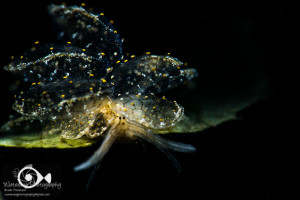
This is a post-processing tip inspired by the many almost beautiful photographs I see in my underwater group news feeds. So many of these photographs have great composition, interesting subjects, and good lighting, but lack the “umph” needed to be truly fantastic. It’s an easy fix, too, and one that should be employed as a matter of routine in all post processing. I’m talking about correcting white balance, of course, and using a few other basic tools. Here we will cover how to make a photo go from this:

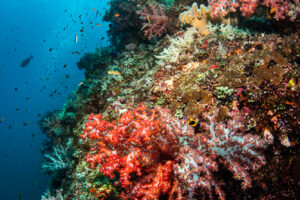
to this:

in just a few easy steps. I use Adobe Lightroom CC for the majority of my post-processing and I will use Lightroom in this tutorial.
Underwater photography has its own unique rules when it comes to post-processing. If you shoot with a DSLR, you have likely been taught to shoot in RAW format, and to use the auto white balance in-camera. This is because it is expected that you will finish processing the photos yourself, rather than letting the camera make decisions about the photograph for you, (as it will if you shoot in jpeg format.) Why shoot RAW files? A RAW file retains ALL the information that the sensor of your camera records. If you use jpeg, the camera picks what information is important, processes it, and throws the rest away. Under water images are affected by the water itself and have issues with lighting, contrast, and loss of color to name a few. The camera is manufactured for images taken topside, so the camera is likely to throw away the wrong information. That is why post-processing under water images is so important.
White balance can be set manually for every shot you take under water, but it is cumbersome and time consuming and can easily be taken care of in post processing. Set your camera to “auto white balance” and use RAW files if possible.
After you have imported your images, you will see them in the “LIBRARY” module. There are several modules in Lightroom along the top right of the screen. After you choose the image you want to work on, you will click on the “DEVELOP” module.

This will bring up a set of tools to the right that you will use to process your image. You can open the tools by clicking on the triangular arrow to the far right of each toolbox. In the toolbox below, you can see that I have the Histogram and the Basic toolboxes open.

I will use the Basic tool box to adjust the white balance of my image. My photo has too much brown/gold in it, and the beautiful colors of the fish are muted. *Unless you are very close to your subject, you are likely to have too much green, blue, or yellow in your image. In the Basic tool box (above), you can see “WB: As Shot” towards the top. You can click on “As Shot” for a drop-down menu of different white balance effects. Try them. You may like “auto” the best. If none of these correct the color issues, you can try adjusting the Temp and Tint sliders or use the eye-dropper tool to the left. Just click on the eyedropper tool, move it over your image until the R.G.B. values in the drop down box are close to 50%, then “click.” (You can also see what your image will look like before “clicking” as you move the eyedropper over it in the small box on the upper left.

Here is my image with only the white balance corrected:

That took only one “click” and it is already much better. I can fine tune it further if I want, by moving the Temp and Tint Sliders.
After I fix the white balance, I will use the sliders from Exposure down to Saturation to bring up the contrast, take down the highlights, etc. The box below shows what settings I used for this image.

This is my final result: